
Notifications Command Centre & Alert Routing Studio
How to monitor, filter, batch-process, and customize real-time operational alerts across every module in Keystone X (/notification/index & /notification/customize).
1. How In-App Notifications Work
Keystone X continuously monitors your business for important operational events—such as stock falling below its reorder point, an invoice becoming overdue, a task deadline approaching within 48 hours, a client approving a quote in the portal, or a new helpdesk ticket arriving.
You can access your notifications in two ways:
- Quick Topbar Bell (): Shows your 5 most recent notifications from any screen.
- Notifications Command Centre (
/notification/index): Clicked via the left Sidebar (Notifications) or View All Notifications in the bell menu. Provides full filtering by status and module, keyword search, and bulk management.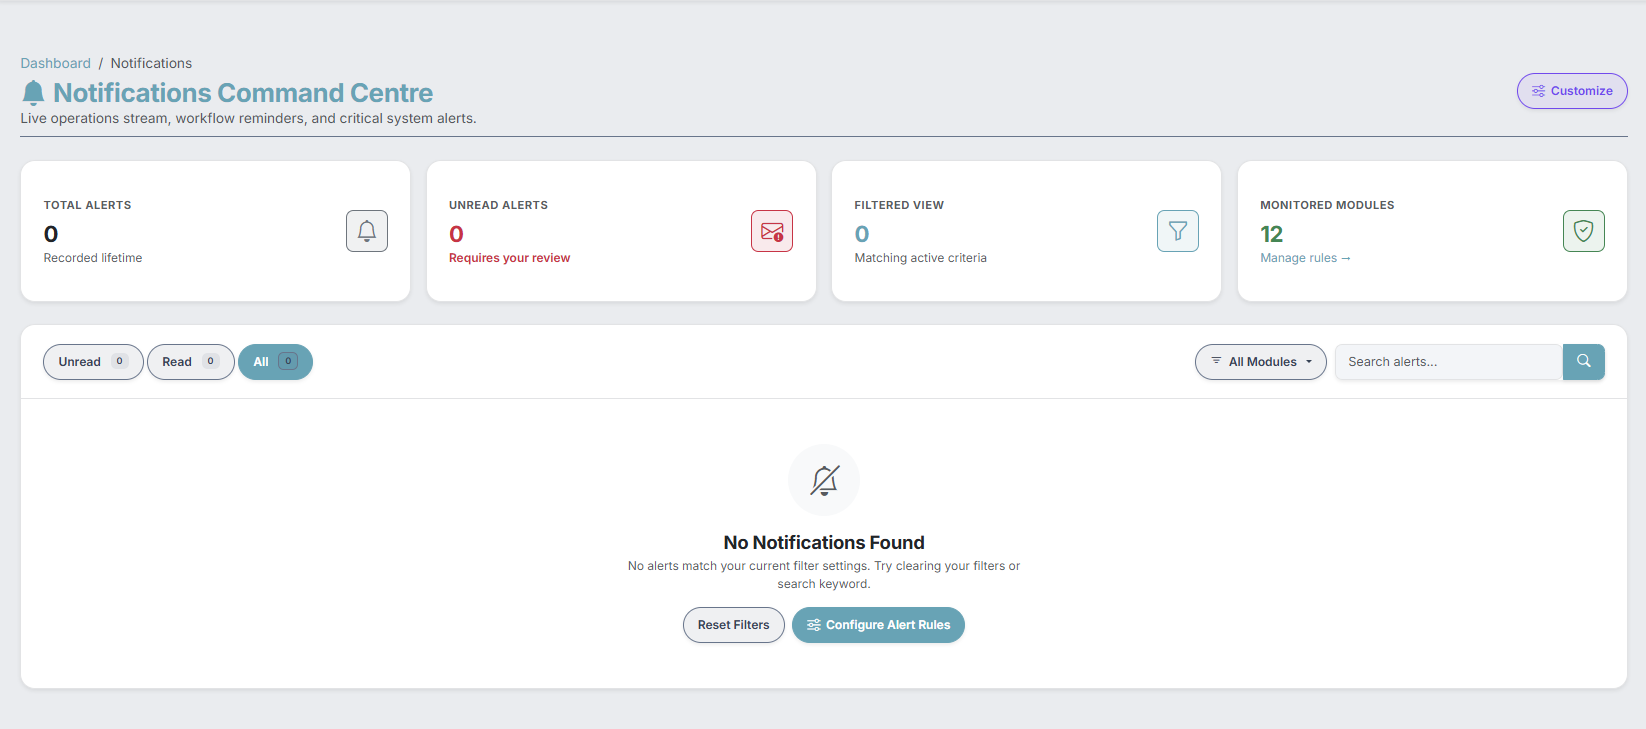
2. Notifications Command Centre (/notification/index)
2.1 Top Header Buttons & 4 KPI Summary Cards
| Button / KPI Card | Function & Description |
|---|---|
| Customize Button | Opens the Notification Rules & Preferences Studio (/notification/customize) where you can turn individual alert triggers ON or OFF for your user profile. |
Mark All Read (#btnMarkAllRead) |
Visible whenever you have at least 1 unread alert. Marks every unread notification in your inbox as read via a background request and clears the red unread badge. |
Clear Read (#btnClearRead) |
Visible whenever you have read notifications stored. Prompts for confirmation and permanently deletes all already-read notifications while keeping your unread alerts untouched. |
| KPI 1: Total Alerts | Total count of all notifications currently stored in your inbox (read + unread). |
| KPI 2: Unread Alerts | Count of new alerts highlighted in red that still require your attention. |
| KPI 3: Filtered View | Number of notifications matching your currently active Status pill, Module dropdown, and Search keyword. |
| KPI 4: Monitored Modules | Count of active ERP modules feeding alerts into your inbox, with a quick Manage rules → link. |
2.2 Filter Bar, Batch Processing & Row Actions
| Control / Column | How It Works |
|---|---|
| Status Filter Pills (Left) | Switch between Unread (default view when opening the page), Read, and All. Each pill displays a live counter badge. |
Module Filter Dropdown (.notif-module-dropdown) |
Isolates alerts from a single department (e.g., Invoices, Inventory, Jobcards, Support Tickets, Tasks). Each module in the dropdown displays both its total alert count and a red pill if it has unread alerts. |
Search Alerts Box (name="search") |
Type any document number, customer name, or keyword and press Enter to search across notification titles and messages. Click the icon inside the box to clear the search. |
Select Checkboxes & Batch Action Bar (#batchActionBar) |
Tick individual row checkboxes (or tick the top-left #selectAllCheckbox header box to select the entire page). A blue bar appears showing how many items are selected, with three bulk buttons: • Mark Read ( #btnBatchMarkRead): Marks all selected alerts as read at once. • Delete ( #btnBatchDelete): Permanently deletes all selected alerts after confirmation. • Deselect ( #btnBatchDeselect): Unticks all checkboxes. |
| Row Action Icons (Far Right Column) | Each notification row provides up to three action buttons: • View Record: Automatically marks the notification as read and takes you directly to the linked invoice, quote, job card, task, or stock item (via /notification/open/{id}). • Mark as Read: Marks that single row as read in-place without leaving the page. • Delete: Removes that single notification from your inbox. |
3. Notification Rules & Preferences Studio (/notification/customize)
Accessible by clicking Customize in the Notifications Command Centre, clicking Rules inside the topbar bell dropdown, or clicking the Studio icon next to Notifications in the sidebar.
This Studio allows each individual staff member to control which automated triggers appear in their personal notification feed. Only modules that are currently enabled in your company's active License Tier and Site Settings are shown.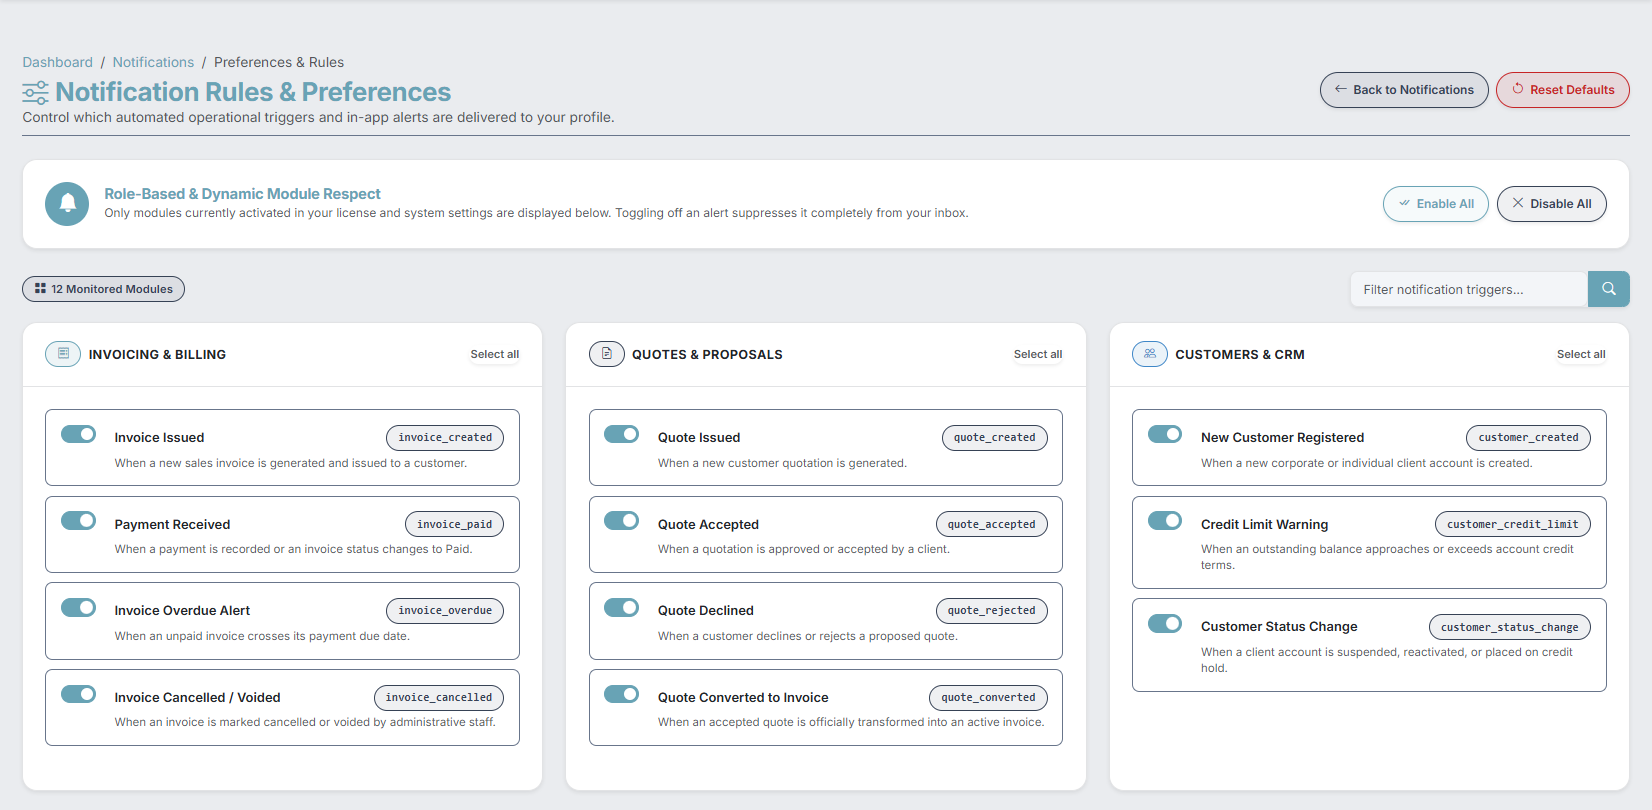
| Studio Control / Button | Exact Behavior |
|---|---|
| Back to Notifications Button | Returns to the main Notification feed (/notification/index) without saving unsaved changes. |
Reset Defaults Button (#btnResetDefaults) |
Prompts for confirmation and posts to /notification/resetPreferences, restoring all notification triggers for your account back to their factory-enabled state. |
Enable All / Disable All Buttons (#btnEnableAll / #btnDisableAll) |
Toggles every switch across all module cards ON or OFF with a single click (remember to click Save Notification Preferences at the bottom to commit). |
Filter Notification Triggers Search Box (#moduleCardSearch) |
Live instant filter: type any keyword (e.g., overdue, stock, ticket) to hide non-matching switches and cards in real time. |
| Per-Module Card "Select all / Deselect all" Link | Located in the top-right header of each module card. Toggles all notification switches inside that specific module card ON or OFF. |
Individual Trigger Switch (notifications[key]) |
Each card lists specific system events (showing the human-readable Title, the technical event code badge, and a plain-English Description). • Switch ON (Blue): You will receive real-time in-app alerts when this event happens. • Switch OFF (Grey): The system silently suppresses this alert for your user account so it does not clutter your bell icon or inbox. |
| Save Notification Preferences Button | Saves your personal alert matrix immediately to the database. |